How to Install Sheet Vinyl Flooring
Vinyl wears well, resists water and is one of the most affordable flooring options available. Installing a sheet vinyl floor is a manageable DIY project. The key to success is preparation. Learn how to install vinyl sheet flooring.
Tools and Materials
- Trowel
- Floor Roller
- Tape Measure
- Pry Bar
- Floor Molding & Trim
- Sheet Vinyl
- Adhesive
Estimate How Much Sheet Vinyl Flooring You’ll Need
Measure the area of the room in square yards. To get square yards, calculate the square feet first. Measure the length and width of the room.
- Length (Feet) x Width (Feet) = Square Feet
- Square Feet ÷ 9 (Square Feet in a Yard) = Square Yards
For example, a 12-foot-by-8-foot-room is 96 square feet or 10.67 square yards.
Prepare the Room
You’ll need to do some prep work in the room before you begin putting down the vinyl.
Step 1: Disassemble the Room – Remove the furniture, appliances or toilet. Take the doors off their hinges.
Step 2: Remove the Floor Trim Molding – Slowly wedge a pry bar between the trim and wall, inserting a small block of wood behind the bar. The wood protects the wall from damage and provides leverage when prying the trim away.
Step 3: Remove the Trim Nails – Remove the nails with pliers. If the nails are embedded in the moulding and you plan to reuse the same trim later, pull the nails through the back of the moulding to prevent it from splitting.
Prepare the Floors
- Concrete: Sheet vinyl can be installed over concrete if the surface of the concrete is clean, smooth and dry. Repair any holes or cracks. You can lower high spots with a grinder. Any minor bumps can be removed with a masonry chisel and small sledgehammer. Wear safety glasses.
- Linoleum or Vinyl Flooring: Sheet vinyl can be laid over old linoleum or vinyl flooring if the existing floor is in good condition. If the old floor has a rough texture or some indentations, use a coat of embossing leveler. Applied with a straight-edged trowel, the embosser will create a smooth surface to support the new floor. Damaged or loose vinyl flooring should be removed.
- Floors Requiring Underlayment: If you have a hardwood, embossed, cushioned, buckled or uneven floor, it’ll require an underlayment. Bumps or dips in an old floor eventually will show through the new floor. As time passes, the new floor will acquire the texture of the floor below. If removing the old floor is impractical or the rough area is too severe to use an embossing leveler, cover it with a new layer of plywood underlayment.
Unless otherwise directed by local code, 1/4-inch BC plywood makes a good underlayment. Make sure any plywood you use is underlayment grade. Remember that this will raise the floor level.
Door frames will have to be cut at the bottom to accommodate the new thickness, and you’ll have to replace the thresholds. If the new floor is in a kitchen, some cabinets may have to be raised to accommodate the raised level of the refrigerator.
Install the Underlayment
Now you can begin putting down the underlayment.
Step 1: Prepare the Door Frame – Cut through the bottom edges of the door moulding to allow space for the new underlayment to slide underneath. Use a small piece of underlayment as a spacing guide.
Step 2: Nail Down the Flooring – Nail down any old, loose flooring with ring-shank nails. Set the nails below the floor surface, and fill any holes or cracks.
Step 3: Install the New Underlayment – Stagger the seams of the plywood panels, leaving a 1/32-inch gap between panels to allow for expansion. Leave a 1/8-inch gap along the walls. Always use the fasteners and fastening pattern recommended by the vinyl floor and plywood manufacturer.
Step 4: Level Uneven Areas – If necessary, use a ready-mix floor leveler or cement patching compound to smooth out any uneven areas where the underlayment panels meet. Allow it to dry and then sand it smooth. Clean the floor thoroughly. The surface must be smooth and free from debris, grease or wax.
Cut the Floor to Fit
Vinyl roll flooring is sold in 6-foot and 12-foot widths, making it possible to install a seamless floor in smaller rooms such as bathrooms, halls and kitchens.
Allow the new vinyl floor to acclimate to the room by leaving it in the room where it’ll be installed for at least 24 hours before cutting.
There are two ways to measure and fit vinyl. You can measure the entire floor area and then cut the vinyl 3 inches wider than the floor area on all sides. Then lay it in place and trim the excess. This method works well in rooms that are easy to fit with few angles or obstacles.
Alternatively, make a template of the floor layout. Transfer the template to the vinyl and make the proper cuts before laying it in place. Use this method with thicker vinyl or in rooms that are hard to fit because of angles or recesses. You may want to use an installation kit, which comes with paper, a marking pen, tape, a cutting blade and complete instructions to make an accurate pattern.
Sketch a Floor Plan
Use graph paper to sketch your floor plan to scale. Don’t forget to include the areas in closets and beneath movable appliances. If you plan on trimming and fitting rather than using a template, add 3 inches along the outside.
How to Lay Vinyl Flooring by Trimming in Place
Follow these steps if you plan to trim and fit the floor after laying it in place.
Step1: Mark the Vinyl – Transfer your floor plan sketch to the vinyl sheet with a washable marker.
Step 2: Cut the Vinyl – Before cutting your vinyl, place a scrap piece of plywood underneath to keep the subfloor from being damaged. A clean garage floor is a good place to cut vinyl flooring to size.
Step 3: Position the Vinyl – Lay your cut vinyl in the room in position, allowing the edges to curl up against the wall. Remember to allow 3 inches on each side for trimming.
Step 4: Trim the Outside Corners – Trim around outside corners or other protruding objects by making a vertical slice down the sheet. Cut the vinyl from the top down to where it touches the floor.
Step 5: Trim the Inside Corners – Cut the vinyl in V-shaped cuts where it overlaps. Work your way down carefully, making several V-cuts until the vinyl rests flat.
Step 6: Trim Along the Walls – Press a 2 by 4 against the bottom to crease the vinyl where the wall meets the floor. After making the crease, use a straight edge to cut the flooring. The floor will expand, so leave a 1/8-inch space between the wall and the new flooring.
Step 7: Attach the Moulding – Use the same principle to reattach the shoe moulding and baseboard. Leave them slightly off the floor to allow for expansion. Nail the moulding to the wall, not the floor. Changes in humidity will cause the floor to bind against a tight moulding.
Step 8: Finish the Seam – If your new floor requires a seam and if you’re applying over an old floor, offset the new seam at least 6 inches from the old one.
How to Install Vinyl Flooring Using a Template or Installation Kit
These steps tell you how to fit sheet vinyl if you plan to cut it before you place it.
Step 1: Make a Template – Place the masking paper on the floor. To hold the paper in place, cut triangular holes and tape over them. Leave a 1/8-inch gap between the edge of the paper and the wall (for expansion). Overlap the sheets as you put them down. Tape them together. Be sure to push the template paper under the door jambs and casings.
Step 2: Fit the Template Around the Pipes – Measure the distance from the wall to the center of the pipe. Subtract 1/8 inch. Align a framing square with the edge of your masking paper, and draw a line the length of your measurement from the previous step. Draw the pipe’s diameter on your template at the end of the line you just drew. Cut the line and circle you just drew. Slide the template around the pipe. Tape this piece to the other pieces on either side of the pipe. When all sheets are taped together, remove the template in one piece.
Step 3: Transfer the Template to the Vinyl – The new vinyl should be unrolled laying face up on a clean surface in another room. Place the template on top of the vinyl and trace it with a washable marker.
Step 4: Cut the Outline – Use a sharp utility knife and a straight edge to cut the outline of your floor. Be sure to cut the line to the pipe diameter so the floor will slide into place around the pipe.
Step 5: Position the Vinyl – Roll the vinyl up and place it in the correct room. Unroll it carefully and slide it under door jambs and casings. Try not to crease the vinyl.
Step 6: Finish the Seam – If your new floor requires a seam and if you’re applying over an old floor, offset the new seam at least 6 inches to the side.
Apply Adhesive and Install the Floor
Your new vinyl floor will require an adhesive. A full-bond floor will have adhesive applied to the entire surface area. A perimeter-bond floor will need to be secured only around the edges of the room. Match the proper adhesive to your type of floor.
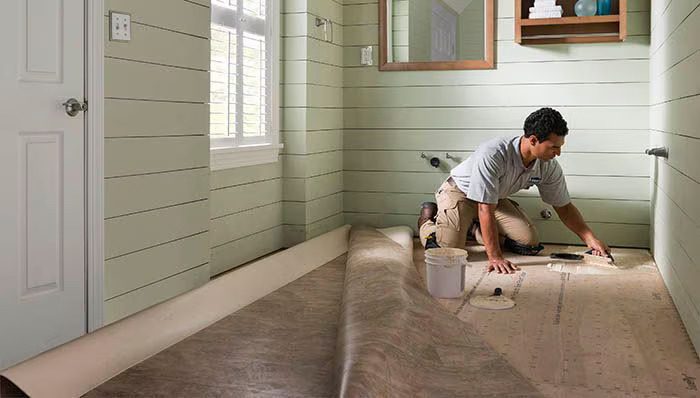
Step 1: Put the Floor in Position – Lay the floor in position. Then fold back half of the floor.
Step 2: Apply the Adhesive – Using a notched trowel, apply recommended adhesive to the subfloor. Always follow the manufacturer’s instructions when applying adhesive.
Step 3: Cure the Adhesive – Let the adhesive sit according to instructions. The open time will allow the adhesive to achieve its best hold.
Step 4: Lay the Floor in Place – Carefully unbend the floor back into place and press firmly.
Step 5: Affix the Remaining Floor – Repeat steps 1 through 4 for the other half of the floor. Clean excess adhesive from your vinyl using a solvent recommended by the manufacturer.
Step 6: Finish the Bonding – Use a floor roller to roll the new floor from inside to outside to fully secure the vinyl to the subfloor. Roll firmly over the entire floor. Bond any seams with a seam sealer, following the manufacturer’s directions.
Step 7: Install the Moulding – Replace the old moulding or install new moulding. Plane the door if necessary and rehang it.
Step 8: Remove Excess Adhesive – Clean any adhesive residue left on the floor, but don’t wash the floor for three days (or whatever the manufacturer recommends). Excessive moisture at this time can affect the adhesive bond.
Step 9: Allow the Adhesive to Dry – Keep foot traffic to a minimum for 24 hours after installation. The adhesive needs this time to dry and bond.
Step 10: Reassemble the Room – After 24 hours, put the furniture back. To avoid damaging your new vinyl flooring, place a sheet of plywood on the floor when rolling or sliding furniture and large appliances.